Showing posts with label home nurse. Show all posts
To anyone who has not been pregnant - or lived with someone who has been pregnant - I have to tell you that the term 'morning sickness' really is somewhat misguiding. It would have one imagining that this pregnancy-associated sickness is isolated to the mornings, however it is anything but. About 80% of all pregnant ladies complain of morning sickness and for most ladies this nausea lingers the whole day long, and not until the fourteenth week of pregnancy does this queasiness actually lift. The constant pang of nausea is unsettling and if you add vomiting to the equation day-to-day life is simply exhausting. The most likely cause of morning sickness is the body reacting to the pregnancy hormone, human chorionic gonadotropin (hCG). This is the hormone that is detected on a pregnancy test. Some woman experience a more severe form of morning sickness, called hyperemesis gravidarum, where it's challenging to even ingest a glass of water without being sick. This is a completely crippling condition and can often require a stint in hospital to treat.

It's a challenge to eat when struck with nausea, but an empty stomach advocates a queasy tummy, so it's vital to try and tolerate some food. It's best to adopt the policy of grazing on small amounts of bland food during the day, such as porridge, toast, bananas, scrambled eggs or mashed potatoes. Nibbling on some dry biscuits or crackers just before getting up in the morning can help to somewhat ease early morning nausea. Foods which may encourage nausea include fried, fatty foods, and ones that are highly spiced, so these are best avoided. The heightened sense of smell, which accompanies most pregnancies, can also increase bouts of nausea. Every pregnancy is different, so keep a diary of the foods and smells that trigger the nausea and until this stint of sickness has eased try to avoid them, but when avoidance isn't an option stay in well-ventilated rooms.

At a time when it's most difficult to tolerate food, it is crucial to maintain a good hydration level. For optimal health, hydration is important for us all, but certainly when pregnant the more dehydrated you are the more likely you are to be nauseated. As well as sipping on water throughout the day, introduce other ways to increase fluid intake, such as sucking on ice cubes, eating fruit, vegetables and low salt soups.

When you're overcome with nausea and that intense tiredness, which most pregnant ladies experience, be kind to yourself, take any help that's offered and rest. Nausea can be worse when tired so if you're feeling a little lethargic, listen to your body and take a break. During your pregnancy the tiredness and nausea can often be a signal to slow down. After-all, your body is going through a dramatic change with a little person being created from a combination of cells, so it's important to conserve what energy you can. Rest, whenever possible, take plenty of fluids, ask for help from loved ones, and always inform your doctor or midwife of your morning sickness and any associated side effects.

Ginger Snaps

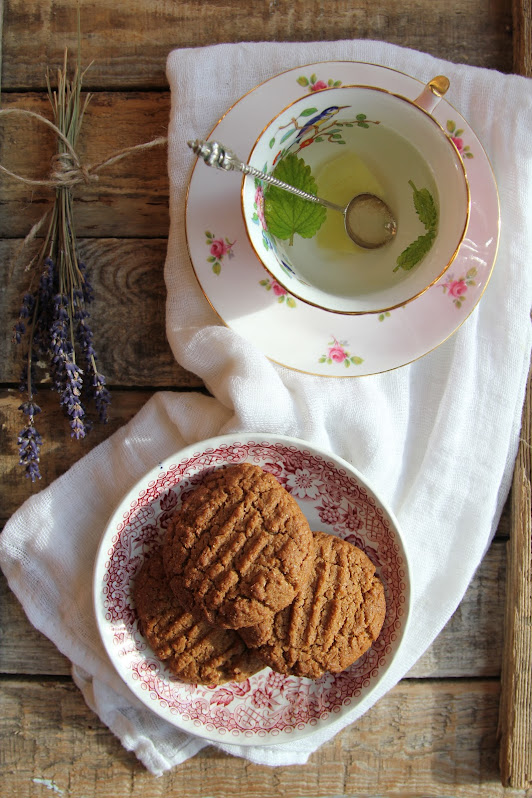
Ginger has been used for centuries to ease a queasy tummy. When inflicted with nausea you may not be too inclined to whip out the mixing bowl, so pass this recipe on to your other half or anyone who's looking to give you a helping hand. Store them beside the bed, in a sealed tin, to help ease the early morning pangs of nausea. For a nice nutritional boost, I'm using sel-raising wholemeal flour, however, it can make the mixture a little extra crumbly when trying to assemble before cooking.  


Ingredients
150g butter
75g soft brown sugar
2 tbsp golden syrup
275g wholemeal self-raising flour
2 tsp ground ginger
1 tsp ground cinnamon
 
Method
  1. Preheat the oven to 180°C/fan 160°C/gas mark 4. Line two baking trays with parchment paper.  
  2. In a medium sized saucepan, melt the butter, sugar and golden syrup over a low heat. With a wooden spoon, stir continuously until the mixture is fully melted and combined. Remove from the heat and allow to cool slightly. 
  3. Sift the flour, ginger and cinnamon into a bowl. Add to the saucepan, stirring well to form a ball of dough. 
  4. Once the mixture is cool enough to touch, take a spoonful, about the size of a soup spoon, from the pan and using the palm of your hands roll into a small ball and place on the prepared baking tray. Leave a little room between each biscuit as they do expand a little during baking. With a fork, gently press down on the top of each biscuit. Repeat with the remaining dough, to make approx. 12 biscuits. 
  5. Place in the preheated oven for 12-15 minutes, until the biscuits have puffed up a little and are a delicious brown colour. Allow to cool for a few minutes on the tray before transferring to a wire tray. Once completely cooled, store in an airtight container for up to 3 days. 
Recipe and text taken from my Home Nurse column - Farmers Journal May 2015
I also shared my recipe for Bircher Muesli in the above column, and I previously shared it here on the blog.
For anyone who practises lent, the forty days of abstinence from sweet treats ceases over the Easter weekend, making chocolate goodies an integral part of the Easter celebrations. Certainly, in a house with children under its roof, chocolate eggs are always aplenty, and once that first one is cracked open, an easter egg-eating marathon is inevitable for hours, or sometimes days, to come. For most, indulging in a few chocolate eggs won't cause any harm, just maybe some tummy aches. However, such an abundance of chocolate on offer can cause serious temptation to those who are either on a strict diet or must avoid chocolate and sugar for medical reasons. If chocolate is your vice, one of the best ways to survive the temptation of Easter treats is to stock up on goods that allow for a chocolate hit, yet are somewhat guilt-free. A good quality, high-cocoa (at least 70% cocoa solids) dark chocolate is great to have in the press, as nibbling on a square can quash a chocolate craving, and dark chocolate also works well as an ingredient for chocolate cakes and bakes. Cacao powder can be used in many dishes, and little of it is needed to give an intense, chocolate hit, along with the benefit of a nutritional, disease-fighting anti-oxidant, boost. For a soothing, hot drink, a spoonful can be added to a cup of warm milk, but as cacao powder can be slightly bitter, a little honey, or your regular sweetener, can be added to taste. Cacao powder is also a delicious addition to a smoothie mix. While a nutritious, chocolatey, ice-cream can be made by blitzing a few frozen bananas, with a drizzle of maple syrup or honey, and a little cacao powder. 

If your house is like mine, and a tsunami of chocolate eggs is imminent, before the first one is cracked put a little time aside to make or buy a few less-guilty treats to enjoy over the Easter season. At least when everyone else is tucking into their chocolate egg you'll be prepared by having something healthier, and possibly even tastier, to appreciate with an afternoon cuppa.


Easter Energy 'Eggs'


If you are planning on making some tasty treats to gift this Easter, this mixture makes enough for two half dozen cartons; one for a friend and one for your fridge. Each one is fairly filling, so it should keep any chocolate cravings at bay. A combination of nuts can be used, but I find hazelnuts and cashews work particularly well.  


Ingredients

Makes 12

200g dates, pitted

4tbsp natural peanut butter

70g roasted hazelnuts

50g unsalted cashew nuts

25g sesame seeds

25g sunflower seeds


Method

1.     You will need two empty egg carton. Add six cupcake cases to each.

2.     If the dates are dry, soak in warm water for 10 minutes, then drain and pat dry. Add the dates to the processor and blitz for a few seconds, until the pieces are very small.

3.     Add the rest of the ingredients and blitz to combine, but be careful not to over process. Don't fully blitz the mixture. Leave some roughly chopped up bits in place.

4.     Remove the blade from the bowl. Take a spoonful of mixture and careful mould, with the heat of your hands, into an egg shape. Repeat this with the remaining mixture, making twelve 'eggs'.


Text and recipe taken from my 2019 Irish Country Living Easter column.


Our NutriBullet must be at least seven years old, and out of all the gadgets we have in the kitchen it's the one most used. Daily juices and post-workout shakes, for the exercise-enthusiasts in the house, are what it's used for most, but I also grab it when I want to whip up a hummus, breadcrumbs or even the odd cocktail. Generally, we don't stick to a recipe when we're making a smoothie, as it's dependent on what is in the fridge, freezer or fruit bowl, but this recipe I'm sharing with you today is one combination everyone in the house enjoys. The creamy citrusy flavour is somewhat reminiscent of an old-style super split ice-cream, making it a deliciously refreshing and nutritious start to the day for the digestive system.


Morning Juice Boost


Ingredients

75g greek yogurt

1 orange, peeled and pips removed

1 banana, peeled and chopped

½ lemon, juice only

Handful of ice cubes 


Method

1.     Add all the ingredients to a high-powered blender and blitz until smooth.

2.     Enjoy straight away.

The dawning of a new year normally sparks something within us to begin afresh, whether it’s in the form of a healthier diet, exercising more, altering a career path or taking up a new-fangled hobby. After the year we’ve all experience, I think we can be forgiven for not embracing the whole resolution ritual with as much gusto as we may have in previous years. However, without it even being a conscious pledge, our health and that of our loved ones will most likely be what’s at the forefront of our minds as we apprehensively embrace this brand-new year.

Thankfully, in recent times, press and social media platforms have become less focused on promoting the diets which hold the promise of the illusive, flawless figure, and concentrate more on endorsing the strong body and mind, and along with it an acceptance that bodies do indeed come in all shapes and sizes. If you have suffered from any sort of ill health in the past, I'm sure you'll agree with me, the desire for the body to heal and become stronger will always outweigh those extra couple of pounds on the scales.

Eat less, move more, is a long-standing mantra for a healthier lifestyle, and makes perfect sense for those striving for a little weight loss. Nevertheless, if we’re trying to strengthen our bodies, along with increasing our level of exercise, we also need to eat a little more too, taking particular attention to boost our intake of fresh foods which are nutritionally dense. When adapting to a more nourishing diet it can be helpful to consider, whether a particular dish or food is filled with the sort of nutrients which will help to fuel the body efficiently. With this to the forefront of the mind, we can more often make better food choices. A nutrient-heavy meal need not be extravagant nor costly; a simple poached egg served alongside a slice of wholemeal soda bread is packed with vital vitamins and minerals. Add to it a serving of wilted spinach and a grating of cheddar cheese and it becomes a rather nutrient complete meal. 

It is important to fuel our bodies with delicious wholesome foods, yet still not deny ourselves the occasional slice of cake or treat, when the need arises. Keeping well hydrated and getting a good night’s sleep will also play their part in promoting our bodies into a stronger and healthier state. 


Turkey Meatballs with Spaghetti 


With all the turkey consumed over the festive season, I’d forgive you for bypassing this recipe during the month of January, but as an ingredient turkey is so impressively nutritious it should be celebrated all year round. High in protein and packed with vitamins and minerals, these turkey meatballs are a great addition to this tasty tomato sauce. 


Ingredients

For the meatballs

50g oats

450g turkey mince

1 onion, finely grated 

1tbsp sweet chilli sauce

1 egg, lightly beaten

Sea salt & freshly ground black pepper

For the tomato sauce

1-2 tbsp olive oil

1 onion, finely chopped

2 cloves of garlic, crushed

1 tin cherry tomatoes

1 tin chopped tomatoes

1 tsp dried herbs

1 tbsp balsamic vinegar

1tbsp sugar

Sea salt & freshly ground pepper

350g wholewheat spaghetti

100g baby spinach leaves


To serve

Parmesan or vintage cheddar cheese 


Method


  1. Using a food processor, blitz the oats for a few seconds until finely chopped.
  2. Add to a large bowl along with the turkey mince, onion, sweet chilli sauce and egg. Season well with salt and pepper. Mix together to combine. 
  3. With a small bowl of cold water by your side, using damp hands, roll the mixture into about 20 meatballs. Chill in the fridge until ready to cook. 
  4. To make the sauce, heat a large frying pan over a medium heat and add some olive oil. Add the chopped onion, turn down the heat and sauté for about 10 minutes until soft and slightly coloured. Stir in the garlic and continue to cook for about 30 seconds. Add the tins of tomatoes, balsamic vinegar, dried herbs and sugar. Season with salt and pepper and increase the heat slightly under the pan. Allow to simmer for 20 minutes, stirring occasionally.
  5. Heat some olive oil in another large frying pan. Fry the meatballs, turning them occasionally, until they are golden brown and cooked through. Check by cutting one in half to make sure there are no signs of any pink meat. Add the meatballs to the sauce and cook for a further 10 minutes. 
  6. Meanwhile cook the spaghetti according to the instructions on the pack.
  7. Remove the sauce from the heat. Stir through the spinach and add the cooked spaghetti. Combine well with the sauce and the meatballs.
  8. Divide between four bowls, and grate over a little parmesan or some vintage cheddar cheese. 


This recipe and introduction were taken from my January 2021 Home Nurse column, in Irish Country Living. 


We are well aware this will be a Christmas like no other, but as I hear of cancelled carol services, abandoned school nativities, no visits to Santy and the uncertainty whether or not we’ll be permitted to visit loved ones’ homes over the festive season, it’s difficult not to be a little forlorn for our traditional Christmas celebrations. I suppose the past eight months have prepared us well for honouring important occasions, while still staying within our own home. We’ve all had to become more dependent on home-based activities and making the most of what is under our own roof. Even though baking together with the children was always something I loved to do, I definitely homed in on this as a pastime a little more consciously over the past few months. 

For years, I have taken great joy in baking the cakes, puddings and mincemeat in the run-up to Christmas, and with the help of Millie, since November we had this year’s batch made, wrapped up tightly, and packed into the pantry. Each November, I dedicate a weekend to Christmas baking, and it’s a ritual I really relish. Only recently did I come to realise why I love upholding this tradition so much and it is because these couple of days of baking are always pencilled in and therefore are never rushed. The recipes are in place, the ingredients in the press and all that’s needed are a few Christmas tracks, and maybe the odd hot chocolate, to heighten the experience to something very special. 

Such traditions are what I hope my children will recall when they look back on their childhoods. When I remember my own Christmases past, the memory most etched is that of time spent baking with my own dear mother, when we would be side-by-side with only Perry Como for company on those dark November evenings. 

As a parent, we can sometimes forget, the greatest gift we can give our children is time. They yearn to be by our sides and gain the most pleasure in helping us even with the simplest of tasks. Creating something simple but scrumptious together in the kitchen is a marvellous example of this. 

Normally once December is upon us, crazy season starts, with endless lists to achieve and countless Christmas-orientated activities and dates to attend. In their place, this year, I've decided to start some new traditions which I hope will hold firm even after our busier lifestyles are reinstated. 

I still yearn to see loved ones and pray for a pinch of normality this Christmas, but if this new normal has taught me anything it’s to live more mindfully and appreciate every moment of slowness that comes my way, because within those moments, without even being aware, we are creating memories which have the potential to last a lifetime. 


Cinnamon & Cranberry Cookies

These oaty cookies are the perfect snack to serve alongside a glass of hot milk. I’m using coconut sugar in this recipe, as a less processed sweetener, but light brown sugar can easily be used in its place. 

Ingredients

150g porridge oats

150g wholemeal flour

1tsp baking powder

75g dried cranberries 

200g butter, softened

80g coconut sugar

1 tsp vanilla extract

1 egg

Topping

50g coconut sugar

1 ½ tsp ground cinnamon


Method

1.  Pre-heat the oven to 190°C/ fan 170°C/gas mark 5. Prepare two large baking trays by lining them with greaseproof paper.

2. Using a food processor, blitz the porridge oats until fine. Add to a large bowl with the wholemeal flour and baking powder. 

3. Using the food processor again, give the dried cranberries a quick blitz until roughly chopped. Add to the flour and stir through to combine. 

4. In a separate bowl, add the softened butter, sugar and vanilla extract, and cream together until light and fluffy.

5. Add the egg and a spoonful of the flour mixture, and mix for a few moments to combine.

6. Fold in the remaining oat, flour and cranberry mix. Combine well until the dough can be gathered together into a ball. 

7. On a plate, mix together the coconut sugar and the cinnamon for the topping. 

8. Divide the dough, about one dessertspoonful for each cookie, making approximately 16 cookies, and roll each one in the cinnamon-sugar mixture. Place the cookies evenly spaced on the baking trays and cook in the preheated oven for 12-15 minutes, depending on their size, until golden brown. 

9. Allow to cool slightly on the tray before carefully transferring to a wire rack to fully cool. Store in an airtight container for up to three days. 


This recipe was shared in my Home Nurse Column in Irish Country Living November 2020. 

This chicken noodle broth recipe is one I've previously shared in my Irish Country Living Column. It's a real favourite of mine, as it merges deliciously fresh ingredients into something tasty and wholesome. It can be prepared and made with little effort and time and it is packed with lots of lovely nutrients. 


Chicken Noodle Broth

Ingredients
1 tbsp olive oil
1 onion, finely diced
1 garlic clove, crushed
1 red chilli, finely sliced
Sea salt & freshly ground black pepper
900ml chicken stock
1tbsp soy sauce
2 chicken breasts, very finely sliced
100g fine egg noodles
150g sweetheart cabbage, finely sliced
Handful coriander leaves, roughly chopped

To Serve
A handful of raw cashew nuts
1 red chilli, thinly sliced
2 scallions, thinly sliced
Coriander leaves

Method

1.    Heat the oil in a large saucepan, over a medium heat. Add the onion. Turn down the heat and cook for a few minutes, until softened. Add the garlic and red chilli, and stir through for about a minute. Season with a little sea salt and a few grinds of black pepper.
2.    Pour in the hot stock and soy sauce. Bring to a boil and simmer for 10 minutes.
3.    While the broth is cooking, place a small frying pan over a medium heat. Add the cashews, and dry-fry them for about five minutes until lightly toasted. Toss occasionally to avoid burning. Transfer to a plate and roughly chop. 
4.    Add the chicken to the saucepan, and bring the broth back to a simmer. Place the lid on top and simmer gently for about 5 minutes.
5.    Add the noodles. Stir well to combine and continue to simmer for 5 minutes, before adding the cabbage and simmering for another minute or two.
6.    Just before you're ready to serve, add a handful of roughly chopped coriander. Stir to combine. Taste and adjust the seasoning, if necessary.
7.    Serve straight away. Ladle into four bowls and top each with a few slices of fresh red chilli and scallion, plus a scattering of cashew nuts and a few coriander leaves. Enjoy.


It's nearing my father's anniversary, and in the next few days, just as in the days preceding my mother's, I retrace my steps of how I spent the last few days with him on this earth. What we did together, what I said, and most importantly what he said to me. Recently, I wrote about my experience of grief for one of my Home Nurse columns, in Irish Country Living, so I'd like to share that with you today.
................

My mother passed away in 2007, and a few years later I lost my father. Both times, my upset was inconsolable. In my experience, grief emulates a terrible illness. Even though I had my abilities; I wasn’t bed-bound due to any physical condition, yet in those early weeks of grieving I was incapable of much more than washing and dressing myself. I was feeling physically sick, physically weak, and the intensity of the pain in the pit of my stomach was very real. In the weeks after losing a loved one grief is all-consuming, but months or even years after it can raise its head and hit like a bolt into the stomach.

We often grieve as a community, especially if the death is unexpected. When words fail to comfort our support is often shown through actions. Since the beginning of time, there has always been a place for the community to nurture and feed the bereaved. It seems to be a practice that is standard in most communities and religions worldwide. In the early days of grieving this generosity and kindness can somewhat sustain us and fuel us to be physically able to face the day. After my mother passed away, I was so nauseated with sadness even nibbles of toast and bites of sandwiches were a struggle to consume. However, a kind neighbour arrived at my mother's wake with a large tray filled with a creamy chicken bake. As much as I fought the urge to fulfill the basic human need of eating, I accepted a plateful of this chicken dish and I remember vividly how it warmed my empty stomach and quenched the hunger pains I hadn't even acknowledged were there. At times of sadness, most of us have little or no interest in food, yet it is never more important that we eat well, as a means to keep up our physical strength. A nourishing bowl of food won’t ease the heartache of grief, but it will give a much-needed energy boost to the body. Warm and comforting stews, soups and puddings have that ability.

As the weeks and months pass after losing a loved one, we need to listen to our bodies, which are trying hard to get us to slow down. I remember being overcome with severe tiredness in the month's proceeding both of my parent's deaths. This was hugely influenced by the broken sleep and the sheer anxiety of losing someone I loved so dear. On reflection, I feel in many ways, that over-whelming tiredness was my body urging me to stop, to allow the pressures of day-to-day life to be brushed to one side and simply to be still. Rest and sleep are vital while we grieve. Fuelling our body with nourishing, comforting foods can help. Keeping well hydrated is always vital. While talking and reminiscing about our loved one is ever so important. Writing down memories, which may be a painful exercise, can turn into a rewarding process, and most of all accepting the support of loved ones around us helps to provide a little bit of light and love into the darkness of our grief.


Comforting Chicken Stew with Herbed Dumplings

I have fond memories of devouring big bowlfuls of stew as a young girl. My mother would always have the addition of mini dumplings, and I loved diving in with my spoon to see how many I could retrieve. The dumplings in this dish are more substantial, allowing for two or three per serving. Their soft and fluffy texture merge wonderfully with the flavoursome, rich sauce. This stew is both comforting and nourishing.


Ingredients
1tbsp olive oil
180g streaky bacon, roughly chopped
3 carrots, finely diced
2 onions, finely diced
2 celery sticks, finely diced
200g mushrooms, cut into quarters
Freshly ground pepper
2 sprigs thyme
2 bay leaves
1.2 ltr hot chicken stock
2tbsp tomato purée
4-5 chicken fillets, cut in half

Dumplings
250g self-raising flour
Salt and freshly ground pepper
1 tbsp parsley, finely chopped
1 tbsp chives, finely chopped
125g butter, cold-straight from the fridge
1 tbsp cold water

Method:

1. Preheat the oven to 200°C/fan 180°C /Gas mark 6.
2. Add the oil to a large, oven-proof saucepan or casserole dish. Place over a high heat. Add the streaky bacon and cook for 5 minutes, stirring regularly.
3. Turn down the heat and add the carrot, celery, onion, and mushroom. Season with a little black pepper. Cook for five mins until slightly golden then add the herbs, chicken stock, and tomato purée.
4. Bring to a simmer and add the chicken. Cover with a lid and place in the oven for 45 minutes.
5. Meanwhile, make the dumplings by placing the flour in a mixing bowl. Season with a little salt and pepper, and add the herbs. Finely chop or grate in the cold butter. Gently rub in the butter until it resembles breadcrumbs. Add a tbsp of cold water and bring the dough together to form a ball. If it's not sticking together, add a little more cold water. Divide the dough into 12-15 pieces and roll each one into a ball. 
6. Take the stew from the oven and nestle the dumplings on top of the cooked stew, pushing each one down into the stew so that it is halfway submerged. Place the lid back on the dish/saucepan and return to the oven for an additional 30 mins. At this time, take off the lid and return to the oven for an additional 10 minutes.
7. When ready to serve, lift the dumplings out and place in serving bowls. Stir the stew and then ladle it over the dumplings. Serve with mashed potatoes and peas.


This is an extract from my Irish Country Living Column, August 2019.

Like most parents who work from home the hours between the school drop-offs and pickups are ever so precious. A mountain of work can be tackled in a quiet house, so I generally try to use that time wisely. On days when I'm busy writing, it's always lovely to have something nutritious to refuel with when I'm grabbing a quick break. My go-to is often wholegrain toast, smothered in a good quality nut butter and topped with sliced banana. It ticks all the boxes - quick, tasty, nutritious and filling. Another snack I adore is banana bread, and this recipe is one of my favourites. It's effortless to make, so much so I'll be passing the job of making one weekly over to one of my secondary school boys, once the holidays are upon us. In this recipe, I've used a mixture of pecans and walnuts, but any unsalted nuts would work in their place. 


Banana Nut Bread

This loaf is refined sugar-free and gains its delicious sweetness from the ripe bananas and the addition of some maple syrup. Chia seeds, pecans, and walnuts are a great addition to this loaf as they're packed with heart-healthy vitamins, minerals, and omega-3s.

Ingredients

250g wholemeal flour
1 tsp baking powder
1 tsp ground cinnamon
50g chia seeds
50g pecans, roughly chopped
50g walnuts, roughly chopped
100ml coconut oil
100ml maple syrup
100g Greek yogurt
2-3 (200g) bananas, mashed
2 eggs, lightly whisked
1tbsp oats

Method

  1. Pre-heat the oven to 190°C / fan 170°C / gas mark 5. Using a little sunflower oil, lightly grease a 2lb loaf tin.
  2. Place the flour into a large bowl. Sieve in the baking powder. Add the cinnamon, chia seeds, pecans, and walnuts. Stir to combine.
  3. Add the coconut oil to a large bowl with the maple syrup, Greek yogurt, and mashed bananas. Using a wooden spoon, beat together to combine, while gently breaking down the coconut oil with the back of the spoon. Add the lightly whisked egg and stir well to combine.
  4. Add the flour and nut mixture, and bring the mixture together with a wooden spoon.
  5. Pour into the prepared tin. Sprinkle over the oats and press into place to ensure they stick.
  6. Bake in the preheated oven, for 55-60 minutes, until well risen and golden.
  7. Remove from the oven and transfer to a wire tray to cool. Store in a sealed container for up to 3 days.
Chickpea flour, which is also known as gram flour, is a versatile gluten-free flour. It’s widely used in Indian cuisine within a variety of dishes. In recent years it has become much easier to source chickpea flour. It’s available to buy in specialist Asian food shops and health shops, as well as many of the larger supermarkets. Its consistency works wonderfully in batters, so it’s a great choice for savoury pancake. As this flour is made from ground chickpeas it is also high in protein, making it rather nutritious. I’ve paired these flavoursome pancakes with a simple mushroom and chive filling. These delicious pancakes would serve well for breakfast, lunch or tea.


Mushroom & Chive Stuffed Chickpea Pancakes

Ingredients
Serves 4
For the filling:
1 tbsp olive oil
1 onion, thinly sliced
25g butter
250g mushrooms, thinly sliced
A pinch of sea salt & freshly ground pepper
2 tbsp finely chopped fresh chives
1 tbsp cream
For the pancakes:
150g Chickpea flour {gram flour}
¼ tsp salt
1 egg
250ml buttermilk
1 tbsp finely chopped fresh chives
1 tbsp finely chopped fresh oregano
2 tbsp olive oil

Method
1. To make the filling, heat the olive oil in a medium sized frying pan. When hot, turn down the heat, add the onion and sauté for 3 minutes, stirring regularly. Add the butter. Once frothing, add in the mushrooms. Season with a little sea salt and some freshly ground pepper. Increase the heat and sauté for 5 minutes, until the mushrooms are cooked. Add the fresh chives and cream. Combine well, and then keep the pan over a very low heat, to keep the mixture warm until the crepes are ready to be served.
2. In a large bowl combine the chickpea flour with the salt. Crack the egg into a jug, whisk lightly with a fork and add the buttermilk. Pour the wet mixture into the dry ingredients and using a wooden spoon combine until the batter is smooth. Stir through the freshly chopped chives and oregano.
3. Heat a large frying pan. Add a little olive oil. Once hot add a ladleful of batter to the centre of the pan. Tilting the pan, swish the batter around quickly to form a circle. Cook the crepe for approximately 2- 3 minutes and then flip it over and continue to cook on the other side for another 2 minutes. Transfer to a serving plate, and continue to cook the remaining crepes.

4. To serve; spoon some of the mushroom and chive filling into each crepe, and sprinkle over a little freshly chopped chive to garnish.  
Pancakes are so easy to make, and this is one of the reasons I have loved making them with the children over the years. The pancake recipe below is a little different from the standard pancake mix, but it's still very tasty. These wholesome pancakes contain lots of goodness and nutrients from the porridge oats, eggs and banana. Within the pancake mixture, there's no need for any added sugar, as they're naturally sweetened by the ripe banana. These oaty banana pancakes make for a delicious low-sugar breakfast treat any day of the week.


Ingredients
50g porridge oats
2 eggs
1 ripe banana, mashed
1/2 tsp cinnamon
1 tsp olive oil

To Serve
Fresh berries & a drizzle of maple syrup or honey

Method

1. Combine the oats, eggs, banana and cinnamon using a Nutri-Bullet, a hand blender or in a food processor. Blend for about 1 minute or until the mixture is of a smooth consistency. Leave the batter to sit for 10 minutes to thicken slightly.
2. Place a large, non-stick pan over a medium heat. Add a drizzle of olive oil. Add 6 small ladlefuls to the pan. If using a small pan, do this in two batches. Cook for about 2 minutes on each side, or until golden in colour.
3. Serve immediately with a few fresh berries.