Stuffing greatly benefits from cooking within a turkey or chicken, but the results can be almost as tasty when the stuffing is cooked in a greased casserole dish. Sage, date and pistachio is one of my favourite stuffing combinations; herby, sweet and crunchy. To make a plain herb stuffing simply omit the date and pistachios from the recipe and add an additional 2 tablespoons of fresh, finely chopped parsley, thyme or chives.

Sage, Date & Pistachio Stuffing

Ingredients
75g butter, plus a little for greasing
1 large onion, finely diced
225g white breadcrumbs
2 tbsp freshly chopped sage
8 dates, finely chopped
50g pistachio, shelled & roughly chopped
Sea salt and freshly ground pepper

Method

  1. Pre-heat the oven to 200°C /fan 180°C/gas mark 6. 
  2. Melt the butter in a pan, and add the onions. Reduce the heat to low and cook for five minutes, until the onions are softened but not coloured. 
  3. Place the breadcrumbs in a bowl and add the cooked onions. Combine well and then add the sage, dates and pistachio. 
  4. Mix well to combine and season to taste. 
  5. Grease an oven- proof dish with a little butter and add the stuffing. 
  6. Place in the pre-heated oven for approximately 30 minutes, stirring occasionally to get all the stuffing nice and crispy.


As Christmas approaches, many thoughts are fixed on what to cook over the festive season. As much as I love fresh cream desserts, their limited shelf life can sometimes steer me away from them, and in turn encourages me to opt for a few baked goods in their place. Ones that can be served as a dessert, or pair equally well with a cuppa, are most ideal. These carrot cake muffins work as a nice alternative to Christmas pudding. Crystallised cranberries and mint leaves make for a festive topping but, alternatively, the upside-down muffins can be topped with chopped nuts of your choice. These festive muffins can be thrown together with ease, making them a great option when you've a few little helpers in the kitchen.

Ingredients

125g wholemeal flour
125g plain flour
1 tsp baking powder
2 tsp ground cinnamon
250g light muscovado sugar
200g grated carrot
75g dried prunes, finely chopped
4 free range eggs, lightly beaten
200ml sunflower or rapeseed oil

For Icing
150g mascarpone cheese
50g butter, softened
2 tsp vanilla extract
300g icing sugar, sieved

To Decorate
1 egg white
125g cranberries
18-25 mint leaves
50g caster sugar

Method:

1. Preheat the oven to 200°C/fan 180°C/Gas 6.
2. Place the wholemeal flour in a large bowl and sieve in the plain flour, baking powder, cinnamon and sugar.
3. Add the carrots and prunes. Stir well, with a wooden spoon, until they are thoroughly combined with the dry ingredients. If the chopped prunes are in clumps disperse through the dry ingredients using your hands.
4. Add the lightly beaten eggs to a jug with the oil. Pour the eggs and oil into the bowl and stir well until all the ingredients are combined together.
5. Divide the mixture between 18 muffin cases.
6. Bake the muffins, in the preheated ovens, for 25 minutes and they are risen and golden.
7. Remove from the oven and leave to cool on a wire tray.
8. While the muffins are cooling make the creamy topping. Put the mascarpone, butter, vanilla extract and icing sugar into a bowl and beat together until smooth and creamy.
9. To prepare the cranberries and mint leaves for decorating; in a bowl gently whisk the egg white with a fork. Brush the cranberries and mint leaves with a little of the egg white. Roll the cranberries in the sugar. Then place the mint leaves flat on a plate and generously sprinkle over the remaining caster sugar. Leave to dry for at least 15 minutes.
10. When the muffins have completely cooled, take each from their paper wrapper. The muffins will be decorated upside down to give the ‘pudding’ look.
11. Spread a large spoonful of the icing over each muffin and smooth, using a palette knife.
12. Decorate with the crystallised cranberries and the mint leaves, or else a generous sprinkling of chopped hazelnuts.


These ghoulish cookies would make an interesting centrepiece for any Halloween feast. The recipe is quite simply one for shortbread cookies, but by carefully moulding and decorating each one they can be made to resemble fingers. Happy Halloween!

Ingredients
100g icing sugar
200g butter, softened
300g plain flour
1 tsp vanilla extract
16 blanched almonds

Icing
250g icing sugar
2 tbsp water
1 tsp red food colouring

Method
  1. Preheat the oven to 190°C/fan 170°C/gas mark 5.
  2. Using an electric mixture beat the icing sugar and butter until soft and well combined. This should take about 5 minutes.
  3. Add the vanilla extract and with the mixer on a low speed gradually add the flour. Don’t over beat and once combined bring the dough together into a ball, place it on a sheet of greaseproof paper, cover with cling film and place in the fridge for 30 minutes, to harden slightly.
  4. Take from the fridge and with a tablespoon of the dough at each time, with your hands, roll into a shape of a finger. Squeeze the ‘finger’ to give the impression of a knuckle. Make indentations with a knife to represent knuckle ridges. Prepare two tins with a sheet of greaseproof paper on each. Careful transfer the raw cookies to the trays. Add a blanched almond to the tip of the finger to look like a fingernail. Bake in the preheated oven for 10-14 minutes, depending on their thickness.
  5. While the cookies are cooking prepare the icing. In a medium sized bowl combine the icing sugar with the water and food colouring. Add a few more drops of water if required, or add some more icing sugar if the mixture appears too thin.
  6. Take the cookies from the oven and place them on a wire rack. Immediately after taking them from the oven lift the almond, place a blob of the red icing and then firmly stick the almond back on the cookie. Dot about half a teaspoon of icing at the base of the cookie, as seen in the photo.
  7. Allow to set before serving.

We love a good Halloween party in our house. This ghoulish feast is one of the easiest parties to cater for, as really anything goes, and the gorier the food can look, the better. When there are faces to be painted and a house to be decorated, I never put myself under too much pressure where the food is concerned. Once there are a few spooky looking treats, which I generally prepare a day or so in advance, and a large bowl of some kind of punch, for the children to self-ladle into goblets, the party is in full swing. This could be why Halloween is my favourite holiday; with a little imagination, and even less expense, an evening filled with magical memories is ever so easily achievable.

Halloween is quickly approaching so, over the next couple of weeks, I'm going to share with you some of my favourite Halloween treats to make with little ones. First up, Mummy Cookie Cake Pops!


Mummy Cookie Cake Pops

These Mummy Cookie Cake Pops are so visually impressive that you’d be forgiven for thinking that they are simply for show and may not deliver on taste. I must tell you, however, that even the adults fight over these when I make them. Using just a few simple ingredients, there is little to do to create these wonderful treats. The method is straightforward, however, I must stress the importance of refrigerating the pops in between each step, to ensure they set properly. The white chocolate sets perfectly over the refrigerated pop, giving a satisfying crunch of thick chocolate when bit into, before being met by the soft truffle-like centre. They are deliciously irresistible to both children and adults alike.


Ingredients 
Makes 20 
300g Oreo biscuits
150g cream cheese
20 cake pop sticks or wooden sticks
Sprinkle of icing sugar
50g ready-to-roll icing
200g white chocolate
40 candy eyes

Method
  1. Using a food processor, blitz the Oreos for a few minutes, until they resemble crumbs. Add the cream cheese and continue to blend for a minute or so. The Oreos and cream cheese will combine to look almost like a ball of dough.
  2. Scoop out into a bowl, cover with cling film and pop into the fridge for an hour to stiffen up.
  3. Line a large baking tray with greaseproof paper. Take the Oreo mixture from the fridge. Take a spoonful of the mix and quickly mould into a ball using your hands. Insert a stick into the top of the Oreo ball and place on the prepared tray. Place in the fridge for at least an hour to set.
  4. Meanwhile, sprinkle a little icing sugar on a worktop and thinly roll out the piece of ready-to-roll icing. Cut into small thin strips, which will act as the mummy’s cloth wrapping. Place on a plate along with the candy eyes, ready for assembling the pops.
  5. Melt the white chocolate in a bowl over a saucepan of just boiled water. Take the pops from the fridge and dip each one into the melted chocolate. Allow excess chocolate to drip off. Then immediately stick on the two eyes and add a few strips of icing. Place upright to set, possibly in a glass filled with sugar. They will set in a few minutes. Once the chocolate is hard, place the decorated pops back onto the greaseproof paper lined tray and refrigerate for a further few hours before serving.
  6. These pops can then be stored in an airtight container in the fridge for up to 3 days. Don’t leave these pops sitting out of the fridge for too long, as they may begin to melt a little.

In Ireland, we're very fortunate to have potato growers, on our doorstep, who are passionate about producing the best of potatoes for our dinner table. Potatoes have always been immersed as a part of our history and this long standing merit should be celebrated. When better to honor our potatoes, and the people behind them, than on National Potato Day, which happens to be taking place today, October 7th. It has been reported in recent years the sale of potatoes have decreased, but with a new campaign, being driven by Bord Bia and AHDB Potatoes, things are hopefully looking up for our spuds. As consumers we greatly influence what stays on our supermarkets shelves, so our support is needed for the humble spud and all the jobs they create in Ireland.


I was really thrilled when asked to come on board to help promote the potato campaign. I'm not sure if there is any other ingredient in my kitchen that is as versatile as the humble spud. Soups, salads, casseroles and pies are all on the cards once I've a stash of potatoes in the veggie box. A simple potato soup, packed with fresh herbs from the garden, is my go-to lunch when there is little in the larder and time is limited. This chowder recipe I'm sharing with you today is basically a creamy soup, but it is packed full of goodness with the addition of locally grown potatoes and nutritious fresh fish. Potatoes are especially rich in potassium and are a great source of fibre.


Fish, which is bursting with omega-3 fatty acids, is a great choice for all the family, as it will help to keep bones healthy. This chowder is deliciously indulgent but, in fact, once the cream is omitted, it isn't terribly high in calories. If preferred, simply substitute the cream at the end with a little additional milk. For the fish in the dish, I'm using a mixture of salmon, smoked haddock and cod. Most fishmongers will have no problem preparing the fish for you, but many will have a similar mixture already prepared and ready to use. A bowl of this potato seafood chowder is a meal in itself, but it also pairs perfectly with some traditional Irish soda bread.


Potato Seafood Chowder

Prep time: 10 minutes
Cook time: 20 -25 minutes
Serves: 4 - 6

Ingredients
1 tbsp olive oil
1 onion, finely diced
1 stick celery, finely diced
2 medium carrots, diced
Sea salt & freshly ground pepper
25g butter
1tbsp flour
300ml milk, hot
700ml fish or vegetable stock
450g any potatoes in season, peeled and diced
150g salmon, skinned and diced
150g smoked haddock, skinned and diced
150g cod, skinned and diced
100ml cream
1 tbsp fresh parsley, finely chopped
2 tbsp fresh chives, finely chopped

Method
  1. Heat the olive oil in a large saucepan, over a medium heat. Add the onion, celery and carrots. Season with a little salt and pepper and sauté for 5 minutes until softened, stirring regularly.
  2. Add the butter. Once frothing, stir through the flour and cook for 1 minute. Continuing to stir, little by little add the hot milk.
  3. Bring to a gentle simmer and pour in the stock. Add the potatoes. Simmer for 12-15 minutes, until the potatoes are almost cooked.
  4. Add the salmon, haddock and cod into the saucepan. Simmer for 7-10 minutes, until the fish is cooked through.
  5. Stir through the cream, parsley and half of the chives. Check the seasoning and simmer for one more minute. Ladle into deep, wide bowls, sprinkle with the remaining chives and serve with a few slices of buttered brown bread.

If you are looking for a little potato-based recipe inspiration head over to www.potato.ie where you will find many delicious and interesting recipes.

To keep up to date with the Potatoes: More than a Bit on the Side campaign, follow their Facebook page Potatoes: More than a Bit on the Side, on Instagram at potatoes_morethanabitontheside and over on Twitter at TastyPotatoes using #TastyPotatoes and #NationalPotatoDay.

Disclosure: All views are my own, but I was commissioned by the people behind the Potatoes: More Than a Bit on the Side campaign to create and share this delicious potato-based recipe with you.


As a child I loved coffee, and to this day I still adore it. Even though it wouldn't necessarily be a drink of choice I would offer to my own little ones, one of my boys is particularly drawn to coffee-scented treats and cakes. As a traditional tiramisu recipe calls for raw eggs, alcohol and strong coffee, I decided to try out a child-friendly version. The result was delicious, and it turned out to be a great hit with my coffee-loving young man. This tiramisu can be divided between six glasses or alternatively assembled in one large bowl. It would be the perfect dessert if catering to a large gathering when you are hoping to please both old and young palates, or maybe just make it as a weekend treat. 

Ingredients 
2 tbsp decaf coffee granules 
1 tbsp brown sugar 
300ml recently boiled water 
50ml cream 
250g mascarpone 
1 tbsp vanilla extract 
50g icing sugar 
120g sponge fingers 
2 tsp cocoa powder 
25g milk chocolate 

Method 
  1. To a jug, add the coffee granules and brown sugar. Top up with 300ml of recently boiled water. Stir to combine and place to one side to cool completely before using. 
  2. Place the cream, mascarpone, vanilla extract and icing sugar in a large bowl. Whisk together until well combined and the mixture has the consistency of whipped cream. 
  3. Add a spoonful of the creamy mixture to the bottom of each of the glasses. 
  4. Place the cooled coffee into a shallow dish. Break each of the sponge fingers into four and quickly dip them into the coffee, allowing some coffee to soak in, but be careful that the fingers don't get soggy. Add a layer of soaked biscuits to each glass. Add some more of the creamy mixture. Dust over a thin layer of cocoa powder. Repeat with another layer of sponges and finish with a layer of the creamy mixture. Dust generously with cocoa powder. 
  5. Cover and chill for a few hours or overnight. Before serving, roughly grate a layer of chocolate over each tiramisu. Enjoy!

These buttery, crumbly cookies contain gluten-free flour, making them a tasty treat for coeliac sufferers. However, even if you’re not following a gluten-free diet, I would recommend you give these easy-to-make cookies a try. They're perfect for enjoying with a cuppa.

Gluten-Free Lemon & Almond Cookies
Makes 15 

Ingredients 
100g butter 
50g caster sugar 
zest of 1 lemon 
1 egg 
150g gluten-free flour 
25g ground almonds 
1 tbsp chopped almonds 

Method 

  1. Preheat the oven 190°C/fan 170°C/gas 5. Line two baking trays with parchment paper. 
  2. Using an electric mixer, or by hand with a wooden spoon and bowl, cream together the butter, sugar and lemon zest. 
  3. Add the egg, with a spoonful of the flour and beat together until well combined. 
  4. Sieve in the flour and ground almonds and bring together gently to form a ball of dough. 
  5. Take dessertspoonful of the dough and place on the baking tray, press down a little with a fork and sprinkle each cookie with a few chopped almonds. Make sure to leave some space between each cookie. 
  6. Place in the preheated oven for 15-18 minutes, when the cookies should be golden brown and cooked through. Remove from the oven and place on a wire rack to cool.


For the past number of years, to my absolute delight, we’ve successfully grown deliciously, sweet tomatoes in our tunnel. They are never nicer than when simply sprinkled with a little sea salt, but when I’m faced with a glut of them I tend to use the tomatoes in recipes where I would normally use the tinned variety. A sausage and bean stew is so easy to throw together, on a busy evening, and the results are always so tasty. As much as I’m a fan of bringing a dinner together from whatever is in the press, using fresh tomatoes in this recipe really turns it into something special. This tasty stew pairs perfectly with pasta, but when serving on a warm summer’s evening, I like to serve it with a simple salad and lots of crusty bread.


Sausage & Bean Stew 
Serves 4 

Ingredients 
454g good quality sausages 
1 tin cannelloni beans 
650g cherry tomatoes or 2 tins of cherry tomatoes 
1 onion, roughly diced 
1 yellow pepper, cut into strips 
4 cloves garlic, peeled and roughly chopped 
1tsp smoked paprika 
1tsp sugar 
1tbsp balsamic vinegar 
1 tbsp olive oil 
Sea salt and freshly ground pepper 

To serve 
Crusty bread 
Green salad

Method

  1. Preheat the oven to 200°C/fan 180°c/gas 6. 
  2. To a large roasting tin, add the sausages, beans, tomatoes, onion, pepper and garlic. Sprinkle over the smoked paprika and the sugar. Drizzle over the balsamic vinegar and olive oil and season with a little salt and a few twists of black pepper. 
  3. Combine all the ingredients well and position the sausages on top of the tomato mix.
  4. Place in the preheated oven and cook for 25 minutes. After this time take out the tray and give the contents a good mix, squashing a few of the cherry tomatoes. Place back into the oven for a further 15 minutes. 
  5. Take from the oven and serve straight away with a green salad and some crusty bread.

Once the summer holidays are here my children think daily ice-pops are obligatory. In a bid not to spend a small fortune on summer ice-creams, I like, when time prevails, to keep a stash of the homemade variety in the freezer. Ice-pops are ever so easy to make. If you haven’t the little ice-pops moulds, a disposable cup and an old, clean, lollypop stick will give the same result. Throughout the summer months, the boys and Millie tend to take over at least one shelf of my freezer, and pack in their own homemade ice-pops. These are normally made with water and a drop of cordial. They’re a real novelty for the hot days, and I’m always glad the children are getting an extra bit of hydration. At the moment, I’ve an abundance of strawberries in the tunnel, so a few handfuls are often used to make these strawberry yogurt pops. They're made in minutes, taste great and they're considerably more nutritious than a shop-bought variety.

Super Simple Strawberry Ice-Pops 
Makes approx 6 pops 

Ingredients 
200g strawberries 
50g icing sugar 
200g Greek yogurt 
1 tsp vanilla extract 

Method 

  1. Using a blender, blitz the strawberries and icing sugar until smooth. Add the Greek yogurt and vanilla extract and blitz until combined. 
  2. Divide the mixture between six ice-pop moulds. Freeze for at least 4 hours, or preferably overnight, when the pops will become solid.

At the age of ten, I had a life-changing (for a ten year old anyway) talk with a lorry driver. A herd of cattle, many of whom I was rather fond of, were being transported away from our farm. As I always imagined, like many before them, they were about to embark on a trip to a nice farm in another town. However, to my horror, this lorry driver disclosed to me that there was no farm or happily ever after at their final destination. Now, I did realise where meat actually came from, however I somehow never considered my beautiful bovine friends were amongst those destined for someone's dinner table. I cried for hours that day and the only consolation I could give myself was that never again would I eat meat. That evening, I declared myself to be a vegetarian. I was rather proud of myself, but it was a decision which left my mother with a bit of a dilemma. In 1980's Ireland, dinner options were few and far between when meat wasn't taking the leading role on the dinner plate. I had always been an avid mushroom fan, but their versatility really took charge when my mother needed some dinner inspiration for a fussy pre-teen. From mushroom omelettes to mushroom vol-au-vents (posh nosh in the eighties), mushrooms became a reliable stable in my house. To this day, I still embrace all the goodness of the simple mushroom. My weekly shop wouldn't be complete without a sufficient supply in my trolley. And even though I'm not dealing with any cow-loving vegetarians, many of our weekly dishes happen to be meat-free, and the addition of mushrooms always add a certain amount of cost-efficient meatiness. Mushrooms are rich in vitamins, a good source of protein and a portion of mushrooms also count as one of our 5-a-day, so they really are a champion ingredient to be celebrated all year round.

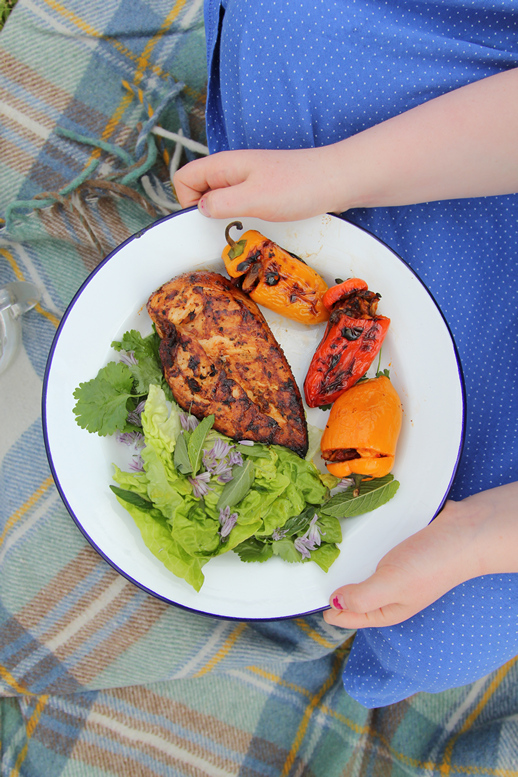
BBQ Mushroom, Cashew & Sun-dried Tomato Stuffed Mini Peppers 

When there is the chance of sun and the barbecue is hot, one of my favourite ways to cook mushrooms is simply smeared with a combination of butter, garlic and fresh herbs, popped in a little foil pouch. They're prepared in minutes and utterly delicious especially when placed on slices of buttery brioche, which have also graced the heat of the barbecue for a few seconds. When entertaining a crowd alfresco-style, I try to keep the menu simple and have as many of the dishes prepared in advance, ready to serve or cook on the barbecue.These mushroom stuffed peppers are ideal, as they can be prepared early in the day and stored in the fridge ready for popping on the barbecue whenever needed. They can be served as an accompaniment to barbecued fish or meat, but they have enough gusto to hold their own when served with a simple green salad.


Preparation Time: 20 minutes
Serves 4

Ingredients

2 tbsp olive oil
250g chestnut or closed cup mushrooms, finely chopped
Sea salt
2 sprigs fresh thyme, leaves only
75g raw cashew nuts, roughly chopped
50g sun-dried tomatoes, finely chopped
2 tbsp sun-dried tomato pesto
12 mini peppers

Method

  1. To make the filling, heat one tablespoon of the oil in a large frying pan. Once hot, add the mushrooms and cook over a high heat for 3-4 minutes. 
  2. Reduce the heat, season with a little sea salt and add the thyme leaves. Add the cashew nuts, sun-dried tomatoes and pesto. Stir to combine and take from the heat. 
  3. Prepare the mini peppers by slicing through two-thirds of the top, leaving the rest of the top and stem in place to form a cap over the filling. Gently, scoop out any seeds. 
  4. Stuff each pepper with the filling and secure the cap back in its place. 
  5. When the barbecue is hot and you're ready to cook, lightly brush the outside of the stuffed peppers with a little olive oil. Place the peppers on the hot grill and cook, depending on the heat of the barbecue, for about 8-10 minutes turning regularly. 
  6. Serve with some other tasty dishes from the barbecue and salads of choice.


If, like me, you're mad about mushrooms, there are many more tasty recipes to be found over here: www.justaddmushrooms.ie

To keep up to date with the Just Add Mushrooms campaign, follow them on their Facebook page More To Mushrooms and over on Twitter at MoreToMushrooms using #MTMSummer.

Disclosure: All views, and memories, are my own, but I was commissioned by the people behind the Just Add Mushrooms campaign to create and share this delicious mushroom recipe with you.   
Bloom in the Park is kicking off this Thursday, June 2nd, in The Phoenix Park, Dublin, and will run until Monday, June 6th. For the past few years I and the children have been amongst the thousands of visitors to this marvellous event, so I'm thrilled to say this year I will be taking part in the festivities. On Saturday morning at 10.30am I'm doing a cookery demonstration on The Quality Kitchen Stage. I'm ever so excited to be taking part, but I'd love to see a few friendly faces in the audience, so if you're planning on visiting Bloom on the Saturday, do pop by and say hello!
I'll be cooking up some delicious, family-friendly, dishes using Bord Bia Quality Assured ingredients. Each morning of Bloom, at the Quality Kitchen Stage, during the 10.30am demonstration (which happens to be my time slot for Saturday) a hamper of cookery books will be up for grabs. So, come early to be in with the chance of winning this lovely prize. 

  
Bloom is a marvellous day out for all the family, and not too pricey as children go free. It seems to get bigger and better each year, so I can't wait to see what's in store for Bloom 2016.

Since I ventured into the world of blogging, many years back, Imen's blog, Farmette, and formerly I Married an Irish Farmer, has always been one of my favourites. It's certainly one of the most visually pleasing blogs I've followed through the years. Lucky for me, I've had the pleasure to meet, eat and chat with Imen on many an occasion, so I can truly call her a friend. I do, however, also consider her to be marvellous mentor, who is ever generous with the sharing of her knowledge of writing, styling and photography. Imen's recently published cookbook, The Farmette Cookbook, has all the appeal of her blog with delicious dishes and beautifully styled and photographed shots, but Imen also shares with us many snippets of her journey from an American city to the Irish countryside. Intertwined between these farmyard tales and the most delectable recipes is a very beautiful love story. One about a girl who loved a dashing farmer from the moment she set eyes on him. Not to spoil the ending for you, but many years and adventures later their love is still strong. It's the delivery of these stories with such heart and emotion, and a lot of wit in between, that makes this book so special.       


I'm always amazed by Imen's stunning shots of farm and food, and each one shared in The Farmette Cookbook are frame-worthy. The accompanying recipes are just as magnificent, so I gave the children the option of choosing the first recipe we would attempt from the book. As flapjack-fans, it was no surprise that Imen's Oat-Millet-Chia-Banana Flapjacks was the chosen one. These flapjacks were so scrumptious, they've now become a regular bake in our house. I have read this beautiful book from cover to cover and with so many splendid sounding recipes I'm eager to try them all.


Jack, Tiarnan and I were privileged to get the opportunity to attend Imen's book launch in Dublin, which is where we bought this wonderful book, so this post is much more of a heartily recommendation, then a review. I can guarantee there are recipes for all to enjoy and stories shared you'll become completely immersed in. You can buy The Farmette Cookbook here and in any good bookstore. 


For the past couple of years I have written my 'Home Nurse' column for Irish Country Living. It's a column I thoroughly enjoy writing, as on one hand it is recipe focused, while on the other it keeps me in touch with my former nursing career. Even though I trained and worked as a nurse, I mostly write these columns from a careers perspective, in the hope they can give a little helping hand to those caring for a loved one at home. The topics are always varied. Last month it was PMS, while I focus on gastroenteritis/ vomiting & diarrhoea in this month's column. In the coming months, I intend on sharing some of my old columns here on the blog. I hope you find them useful and enjoy the read.

Nessa x

Convalescing to Strengthening The Body

When we think of convalescing, the image of a frail, elderly relative, who's overcoming a bout of illness, is always at the forefront of our minds. However, there are so many other times, even from a young age, that our bodies implore us to convalesce. Certainly subsequent to a flu, gastroenteritis or an injury, there is a need to recuperate. Equally post pregnancy, trauma and even while grieving, our body and mind needs to be dedicated some time to strengthen. All too often, as soon as a hint of improved health is upon us we immerse ourselves in the demands of daily life again. Most times this is long before our body can afford it. In turn, we prolong our ailments, which ultimately extends us being under the weather for an undue amount of time. Post illness our immune-systems are low, which fundamentally makes us more vulnerable to a reoccurrence of the illness, or more susceptible to picking up other infections. The key to convalesce is to slow down and embrace some proper relaxation. Forget about work for an extra few days, and allow the immune system the opportunity to rebuild. As well as rest, prompting the body back to health through nutrient-rich foods is paramount. When in recovery mode food can sometimes seems less than appealing, but it's essential that the food we choose to eat is nutritious and in turn this will aid recovery. Porridge, chicken broth or a simple homemade soup are all nourishing and nutritious, and they are also easily digestible. When the body is in need of additional energy, including iron-rich foods such as beef, lamb and dark leafy greens will encourage an optimal Haemoglobin (Iron) level. Vitamin C is an important anti-oxidant which strengthens the body, and also aids in the absorption of Iron; rich sources include berries and freshly juiced citrus fruits. All-in-all a balanced diet that includes nutrient-rich ingredients will aid recovery. It does takes time to rebuild the body to optimal health after an illness or injury, but with plenty of rest, fluids and good food, the reinstatement of a clean bill of health will be a whole lot easier to obtain. 


Coconut Rice Pudding with a Berry & Chia Compote

A creamy and nourishing rich pudding is one of the easiest desserts to make. Coconut milk is naturally sweet and in turn allows for less sugar to be added to the pudding. I love the addition of the coconut milk, but if you're not keen on using it, simply substitute with regular milk. The vitamin-rich berry compote is further enhanced nutritionally by the addition of the omega-rich, antioxidant-boosting chia seeds. This pudding and compote is delicious served with a scoop of ice-cream on the side, but for a healthier alternative top with some frozen yogurt.

Ingredients 
75g arborio or short grain pudding rice
400ml coconut milk
300ml milk
50g caster sugar
1 tsp vanilla extract

Berry & Chia Compote
125g blueberries
75g strawberries
1tsp honey
1 tsp chia seeds*

To Serve
Frozen yogurt/Ice-cream
Sprinkling of chia seeds*
Drizzle of honey

Method

1. Preheat the oven to 150°C/Fan 140°C/Gas 2 and grease a 1.5 litre ovenproof dish with a little butter.
2. Place the rice in the dish. In a large saucepan over a low heat, gently heat the coconut milk, the milk, caster sugar and vanilla extract together. Once it begins to simmer take from the heat and pour over the rice. Stir well to combine. Cover the dish with tinfoil.
3. Place in the oven for 1 1/2 hours, taking from the oven every 30 minutes to give it a stir. After an hour take the pudding from the oven, remove the tinfoil and return to the oven for a further 30 minutes. 
4. Prepare the compote by adding the blueberries, strawberries, honey and chia seeds to a blender and blitz for about 30 seconds. If you don't have a blender, simply mash all the ingredients together until they are well combined.
5. To serve, divide the rice pudding between four bowls, add a spoonful of the berry & chia compote and top with either a scoop of frozen yogurt or vanilla ice-cream. To finish, sprinkle over a few chia seeds.


*My chia seeds of choice are from Waterford-based company Chia Bia. Chia seeds are extremely versatile, so when Chia Bia asked me to create a few new recipes for them I was delighted to take on the task. Check out their blog for some of my Chia Bia inspired recipes.

My children are now back to school after the long Easter break, and I'm sure they're settling into work as normal. A little different to the weeks preceding the holidays, when their school was buzzing with the publication and launch of An Grianán's own cookbook, Templelicious. I thoroughly enjoyed working on this project, so I was ever so proud when the day to launch the book actually arrived. To bring more excitement to this momentous day, Neven Maguire joined us to officially launch the book. The school was packed to capacity with the children, their parents, extended family, community members and many guests, including Westmeath GAA star Kieran Martin. Local newspaper photographers were taking snaps at every opportunity, while Midlands Radio 3 reporter Ríona Cleary took the time to have a few words with me, the children, staff and, of course, Neven. This was broadcast the following Monday, and I've attached the piece below, for anyone who'd like to have a listen. 
Once all the formalities and speeches were taken care of it then came the time to sample some of the delicious dishes from Templelicious. Many of the children, and their parents, helped to bring the cookbook to life by bringing their dishes along to the launch for the guests to sample. I'm glad to say, the day went by without a single hitch. It was such a special occasion. I know it will be fondly remembered by all involved for many years to come. 
My fourteen year old son, Jack. The designer and typesetter of Templelicious. {On a side note -Any parent of teens can probably relate to me - How tall are teenagers these day? I'm wearing four inch heals in this pic!}


Being the gentleman, that Neven Maguire is, he took the time to chat with the children involved in the project. My son, Tiarnán, and nephew, Eoin, were thrilled to meet Neven.

Neven with members of our hard working committee.


Principal of An Grianán, Master McGowan.


We're overjoyed with the feedback we're receiving about the book. Many of the local press took the opportunity to feature Templelicious, and we even have a featured article in this week's Farmers Journal - Irish Country Living. 


Templelicious is priced at €15 and is available to buy in many local shops. It can also be purchased directly from the school on 090-6481085.

For the past few months I have been working on a very exciting project. It's a cookbook with my local national school, An Grianán N.S., Mount Temple. I'm delighted to say it is now back from the printers and it's looking splendid. 'Templelicious' is a collection of recipes, from the 4th, 5th and 6th class students and the staff of An Grianán, but there are also recipes from some well known celebrities, such as Neven Maguire, Robbie Henshaw, John Heslin and James O' Donoghue, as well as plenty of inspirational quotes from some of the children's sporting heroes. Additionally, the book includes words of wisdom, including kitchen tips, remedies and old wives' tales, from the local active age group. All in all, this is so much more than a recipe book, it’s a glance into moments the school children hold close to their hearts, while also being reflective of the community of Mount Temple as a whole.


This project has been incredibly rewarding for the entire school. From choosing the title of the book to styling and photographing the food photos, the children have been involved every step of the way. The older end of the school submitted their recipes, while the younger end had the opportunity to recipe test these recipes before the book went to print. The book was compiled and edited by the school's cookbook committee, comprising of my good self and staff members, Ambrose McGowan, Anna Cahalin, Áine Curran, Catherine Claffey, and Carmel Keogh. My eldest son, Jack, took on the role of designer and typesetter, and, I must say, he did a marvellous job.


My son, Tiarnán, is in 4th class, so his chosen recipe for the book was Sweet Scones. Like so many of the other children, he chose this recipe because it's one of his absolute favourites. This is part of the wonder of a book like this; for these children, in years to come it will be a little snapshot of their childhoods.


The book will be launched by Neven Maguire, in the school, this Wednesday, the 9th of March, at 2pm. On the day, members of the Westmeath Senior football team will also be making an appearance. Tea and samples from the book will be served, and all are welcome to attend. The book will retail at €15.


If you would like to buy a copy of the book please contact the school on 090-6481085.