Last week I got the opportunity to interview Donal Skehan. He was filming one of the programmes for his new series, Kitchen Hero, in the Beautiful Grouse Lodge and as this is only a few minutes from Moate I met him for a chat. I will post this interview later in the week but first I want to share with you a totally delicious and moist Chocolate Cake. As it was Millie's 1st Birthday this week I baked one of Donal's recipes as the cake.
In place of the cocoa powder, I substituted it with melted chocolate - 125g bar of 46% cocoa which I picked up in Lidl and added this along with the milk and oil. Similarly for the topping, I substituted the cocoa with 100g of the same chocolate(melted) -What can I say I can't resist adding a little extra chocolate! I served the cake with a little whipped cream and some fresh berries. This recipe comes together very quickly and the result is heavenly!

Naughty Chocolate Fudge Cake

Makes 1 cake
Ingredients
175g self-raising flour
2 tbsp cocoa powder
1 teaspoon bicarbonate soda
150g caster sugar
2 eggs beaten
150 ml (1/4 pint) sunflower oil
150 ml (1/4 pint) semi skimmed milk
2 Tbsp golden syrup

For the Coating and filling
75g unsalted butter
175g icing sugar
3 tablespoon cocoa powder
A drop of milk

Method
  1. Preheat oven to 180°C(fan)/390f/gas mark 6. Grease and line two 18cm (7 inch) sandwich tins.
  2. Sieve the flour, cocoa and Bicarbonate of Soda into a bowl. Add the sugar and mix well.
  3. Make a well in the centre and add the syrup, eggs, oil and milk. Beat well with an electric whisk until smooth.
  4. Spoon the mixture into the two tins and bake for 25 – 30 minutes until risen and firm to the touch. Remove from oven, leave to cool before turning out onto a cooling rack.
  5. To make your butter icing, place the butter in a bowl and beat until soft. Gradually sift and beat in the icing sugar and cocoa powder then add enough milk to make the icing fluffy and spreadable.
  6. If the cake has risen a little too high then use a serrated knife to even off the top, now sandwich the two cakes together with the butter icing and cover the sides and the top of the cake with more butter icing.
I was delighted to be nominated for the Irish Blog Awards and in turn win the award. To celebrate I decided to run a Competition. All who are following the blog were put in the hat and I'm happy to announce that the winners are.....


1st Prize - Joanne wins the Julie And Julia DVD (With Limited Edition Free Recipe Book) 

2nd Prize- Aline wins Rachel's Food for Living (cookbook)
3rd Prize- Miss Cake Baker wins Fox Run Flower and Butterfly 11 Piece Cookie Cutter Set

Congratulations and please e-mail me your postal addresses.


The boys were giddy this evening and I had to take a few shots before they were all looking at the camera with the winning names!
Tiarnan kept flipping the piece of paper just before the camera would flash. Here is one of those such photos!!! He's a real trickster!!!

Firstly I would really like to thank everyone who sent their good wishes and kind words regarding my Irish Blog Award. I was thrilled to win and I appreciate all your support! I enjoy everything about the blog, the writing, the setting up of the photos and taking them, and when I check in I just love to see a 'new comment alert! To win an award for doing something that is so enjoyable is simply wonderful!


In recent years there seems to be a common ground for many prime time television shows and this appears to be food! Whether it is showcasing quality Irish producers or showing us a novice chef attempting to throw a dinner party, we all seem to want to know more about where our food is coming from and how others are cooking that food. As I love all things food orientated this programming schedule suits me perfectly. My older boys have also become quite interested in cookery shows, I'm not fully convinced whether this is a genuine interest or more that these shows tend to be on around the time they should be going to bed ! Either way I think it is important for children to know how their food makes it to their plates and I always like to encourage this interest.


 In the past few weeks a new cookery show has hit our screens called Masterchef Junior, Australia where children aged between 8 and 13 are competing in the kitchen. I must say however that these certainly aren't ordinary children dabbling in a bit of cooking but ones that are destined to open a Michelin star restaurant in the very near future! They are completely amazing in the kitchen and very inspirational for not only other children but also for many adults. 


 As my boys watch these shows the orders are given to me thick and strong for the next day's dinner. All the dishes look so tempting and when you see an eight year old whipping it up it seems completely effortless to make! I based my recipe below on their Chicken Schnitzels which are similar to the Chicken Goujons, that I already make for the boys, but the chicken breast is tenderised by flattening it with a rolling pin, between some cling film. This results in the chicken becoming so tender that it almost melts in your mouth! These are very easy to make however if you are catering for a large crowd they are quite time consuming but these Schnitzels are so worth it! I like to serve them with a nice salad, a few homemade wedges and a garlic dip. By chance if you have any leftovers they work brilliantly in a wrap with some salad.


Ingredients 


200g white sliced bread
50g parmesan cheese, grated 
6 sprigs thyme, leaves only
1 tbsp chopped chives 

Pinch salt and pepper
2 chicken breast fillet 
1 egg
2 tablespoons milk
70g plain flour
80ml olive oil
40g butter, chopped


1. Process the bread and parmesan in a food processor until fine crumbs. Add the thyme and chives and season with salt and pepper, process until finely chopped. Transfer to a plate.

2. Cut the chicken breast horizontally into thin steaks. Place in between 2 sheets of cling film and lightly pound with the flat side of meat mallet or a rolling pin to flatten.

3. Whisk egg and milk together in a bowl. 
Set up your three plates including one for the seasoned flour. 

4. Coat one piece of chicken in flour and shake to remove excess. Then dip the chicken into the egg mixture. Then coat the chicken in breadcrumbs mixture, pressing firmly to coat. Repeat with remaining pieces of chicken and crumbing mixtures.
5. Heat oil in a large frying pan over medium heat, cook chicken in batches, for 4-5 minutes each side or until tender and golden. Reduce heat to low and add butter around the chicken. Cook until crispy, remove and to a warmed plate. Enjoy!


This article was published in The Westmeath Independent on 16th March 2011.
I have had a very busy few days but now that I am in front of the laptop I thought that I better share with you all that my blog has won an award. As I had mentioned I was in the finaland on Saturday night  the Irish Blog Awards took place in Belfast.  An aunt, with whom I was very close to and fond of, passed away on Friday night so naturally I wasn't able to travel to the ceremony. Jack and I kept a close eye on Twitter and we were overjoyed to see people tweeting that Nessa's Family Kitchen had won Best Newcomer! Sheilia from Gimme The Recipe was good enough to collect the award for me. Thank You again to everyone that makes the awards possible. I'm really chuffed and honoured to be a winner!!

Check out some of the other winners from the night!

Best Popculture blog

Best Food/Drink Blog

thedailyspud.com


Best Lifestyle


Best Music Blog


Best Photo Blog


Best Technology Blog/Blogger


Best Sport and Recreation Blog


Best Blog of a Business


Best Arts and Culture Blog


Best Blog from a Journalist


Best News/Current Affairs Blog


Best Group Blog


Best Political Blog


Best Blog of a Politician


Use of the Irish Language in a Blog

http://igaeilge.wordpress.com


Best Specialist Blog


Best Newcomer


Best Youth Blog


Best Personal Blog


Best Science/Education Blog


Best Humour Blog


Best Blog Post


Best Blog


    I bake a loaf of this White Soda everyday and considering that St. Patrick's Day is almost upon us I thought when better to post this tradition Irish recipe. I would barely have this loaf out of the oven before I have three boys lining up to have a slice covered with plenty of Irish butter.
    Would you believe that I only started making my own bread about three years ago. Before that I would always be treated to fresh home baked bread from my dear Mother. She made bread daily and always maintained that a slice of her brown bread with a piece of cheese was as nutritious as any meal. With practice I have mastered a few of my own breads but White Soda Bread is most certainly the easiest to make! However I have yet to make a bread that tastes as good as my mother's tasted and even though I have a hand written recipe (which I cherish) it just never tastes the same.
    I always remember my mother kneading her soda bread mixture before popping it in the oven. As mentioned before I'm not formally trained as a chef and many of my recipes and methods tend to be what I have found to work best for me. So I tend not to knead but instead I just gather the wet dough together with floured hands and bring it gently together on a floured work surface. Don't worry if it appears sticky just pat with a little extra flour.


    It is the most versatile recipe as even though it is delicious plain the addition of some key ingredients can transform it into something amazing. I previously posted my Sun Dried Tomato and Fresh Herb Soda Bread which works perfectly with a bowl of soup or a piece of really nice cheese! Some spices, like crushed coriander seeds can be added for a mild spicy bread. Many also add raisins or chocolate chips. Any of the above additional ingredients are added with the dry ingredients.  But for today I am keeping my soda bread authentic! As there are so few ingredients in this recipe I love to use all good quality ingredients especially the buttermilk. My favourite buttermilk to buy is Cuinneog Natural Buttermilk. This recipe will be enough for a round loaf or a 2lb loaf tin.   


    If using a loaf tin grease it with some butter but if using a baking tray a sprinkle of flour will suffice to stop it from sticking.

    Ingredients

    450g (1lb) plain white flour, 
    1 teaspoon salt
    1 teaspoon bread soda
    400ml (14fl oz) buttermilk (you may not need all of this so stop adding at 370mls and add more if required)

    Method

    1. Preheat the oven to 200ºC/370ºF/Gas Mark 6  .
    2. Sift all the dry ingredients into a large, wide bowl, and make a well in the centre. Pour in the milk. Using the fingers of one hand, stiff and oustretched like a claw, stir from the centre to the edge of the bowl in concentric circles. The dough should be softish, but not too wet and sticky. When it all comes together, turn out on to a well-floured work surface.
    3. Wash and dry your hands. Pat the dough into a tidy shape and flip over gently, then pat it into a round. Gently transfer to a floured baking tray. Cut a deep cross into the loaf and prick the centre of each quarter.
    4. Bake for 45 minutes or until cooked golden in colour and cooked through.  If you are in doubt tap the bottom of the bread, it should sound hollow. Cool on a wire rack. 
    Soda bread is best eaten on the day it is made but is perfect toasted the next day.


    I am thrilled to be in the finals of the Irish Blog Awards 2011 and to celebrate I thought this would be a great opportunity to have another fantastic competition. Over the past year many of you have followed the blog and in turn left wonderful and positive comments, which makes the whole Blogging experience very rewarding for me!! To thank you for this astounding support I would like to offer some prizes to a few of the lovely followers of Nessa's Family Kitchen
    If you are already following the blog I will automatically pop your name into the hat and if you would like to follow the blog, before March 27th 2011, your name will also be included in the draw. 
    I have some fantastic prizes which include a DVD that I love to watch, a cookery book that I love to cook from and some kitchen tools that I find useful!


    Here are the prizes!!!
    1st PrizeJulie And Julia DVD (With Limited Edition Free Recipe Book)
    2nd PrizeRachel's Food for Living (cookbook)
    3rd Prize-  Fox Run Flower and Butterfly 11 Piece Cookie Cutter Set

    All you have to do to be in with a chance to win one of these amazing prizes is be a follower of Nessa's Family Kitchen. (See the sidebar on the right).
    The competition will end at midnight on Sunday 27th March 2011.
    The winners will be picked at random. I will post worldwide so all my followers are in with a chance of winning. No cash alternative is possible. I will not share any of your details with a third party.


    Yesterday was the day that the finalists were to be announced for the 2011 Irish Blog Awards. It was around lunchtime when the shortlist was made public so I didn't feel it necessary to check the computer straight after breakfast. However, before heading to school Jack couldn't resist having a peep at the Irish Blog Awards website. He came into the kitchen with a turned lip and gently said 'I'm sorry Mammy you're not a finalist'. I gave him a reassuring hug telling him that I was delighted to be shortlisted and even though I was a tad disappointed I certainly didn't want this young man to feel anyway upset! I desperately wanted to see who had made the final and there were no surprises in the Food and Drink Category; all fantastic blogs that I always enjoy reading. I then scrolled down to the Best Newcomer Category and to my delight what did I see, first on the list was Nessa's Family Kitchen.


    A lot of screams and hugs followed and Jack couldn't believe that he had missed the Best Newcomer Category. We were all very happy - to say the least!! I would like to say a big thank you to Damien Mulley and the organisers of the Blog Awards, thanks to the judges and thank you to all who read this blog!

    The awards ceremony will take place in the Europa Hotel, Belfast on 19th March so fingers crossed!!
    tt
    Fionn making the pancake batter!

    In my house pancakes is the ultimate breakfast. The boys adore them and this can work to my advantage. On a busy evening when the boys are being, let's just say 'boisterous' the promise of pancakes can often calm a situation. Believe me, this form of bribery isn't always successful but sometimes it helps to solve a few quarrels and happy boys at the breakfast table is most definitely a good start to the day.


    On one of his recent shows, I saw Jamie Oliver make similar ones. This pancake recipe is so simple to make and you don't even need a weighing scales.

    A proper measuring cup works best but you could also measure with a medium sized cup and simply measure an equal volume of milk to flour.


     Pancakes are just so versatile -  Some thinly sliced fruit can be added to the batter, or fry some chopped bacon and ladle over some batter. There are so many wonderful toppings that suit pancakes. I love mine with home-made granola and Glenisk Greek yoghurt but for a real treat, some freshly whipped cream and a drizzle of maple syrup are divine! The boys love many toppings but Nutella is always a winner for them. Pancakes can be served as elaborate as you please but served simply hot with a knob of Kerrygold butter, a squeeze of lemon and a good sprinkle of caster sugar is fantastic and will conjure up memories of childhood Pancake Tuesdays for many. 


    Pancake Batter


    Ingredients
    1 cup (150g) self-raising flour
    1 cup (200ml) milk
    1 egg
    pinch of salt

    Method
    1. Put the flour and salt in a bowl.
    2. Add the egg and combine with the flour.
    3. Very Slowly add the milk, whisking well with a hand whisk or fork.
    4. When the batter is nice and smooth, cover with cling film and refrigerate for at least an hr. (The batter can be used straight away but tends to have a better consistency when left to rest)
    5. Heat the frying pan and add a little sunflower oil.
    6. Either pour a thin coating of batter or like I have photographed make smaller, thicken ones into the pan. When golden, turn the pancake over and brown the other side.
    7. Add topping of your choice and enjoy!!


    Meringues were most definitely my all time favourite treat as a child. I have always loved little tea rooms that served tea in china cups accompanied by plenty of delicious goodies. This fondness started at a young age when if a truly special treat was on the cards, tea and meringues were normally in the equation! I have many treasured memories of long chats with my mother while enjoying an afternoon tea together.
    Meringues still rate fairly high among my must have desserts. It is quite amazing that the end result of mixing sugar and egg whites could be something so delicious! There is that notion that to achieve flawless meringues many careful steps needs to be adhered to, but really it is fairly simple. If you follow my step by step advice your meringue/Pavlova should turn out altogether perfect.


    Firstly the recipe asks for egg white – no yolk is needed so carefully separate the eggs. The condition of the mixing bowl is important, stainless steal is better than plastic as it is less likely to have any greasy residue remaining from previous use. However you can also achieve perfect meringues with a spotless plastic bowl. The mixture needs to be whipped until stiff, which takes about 5 minutes in a good quality mixer but a little longer with a hand mixer. I wouldn’t recommend whisking by hand - unless you are trying to really build up your biceps! The oven needs to be on a low heat – about 140ºc/275ºf/Gas Mark 1. Once you have checked the meringue and it is firm and crisp but still soft on the inside it’s cooked. Simply turn off the oven and allow the meringue to cool completely before removing from the oven. This stops the delicate meringue from cracking while cooling. Try to resist the urge to open the oven door to peep in at your marvellous creation!


    The Meringue base can be topped with any delicious fruits that are in season! For this recipe I am topping the base with vanilla cream and some cooled poached fruits. I know the finish product looks a little messy but believe me it tastes just heavenly! Last summer there was a great yield of all fruits in Ireland and I still have many bags of berries remaining in my freezer. I have used these for jams and smoothies but I love to have these beautiful berries at hand when I am baking a dessert. To finish off this positively impressive delicacy I like to sprinkle a few chopped nuts but you could also grate a little chocolate. Enjoy!!


    Ingredients
    225g/8oz caster sugar
    A squeeze of lemon juice
    4 free-range egg whites, at room temperature
    For the poached fruit
    500g Mixed Berries
    250mls red wine
    125g caster sugar
    1 orange, zest and juice
    1 vanilla pod, seeds removed (save some for the vanilla cream), or 1/2 teasp of vanilla extract
    1/2 teasp cinnamon
    For the vanilla cream
    300ml/11fl oz cream
    25g/1oz icing sugar
    Reserved vanilla seeds (see above) or 1/2 teasp vanilla extract

    Method

    1. For the meringue, preheat the oven to 140C/275F/Gas 1. Line a large baking tray with greaseproof paper.
    2. Put the sugar and lemon juice into a large bowl. Add one egg white and whisk for a minute. Then add the remaining egg whites and whisk for 5-7 minutes or until the meringue is stiff and shiny.
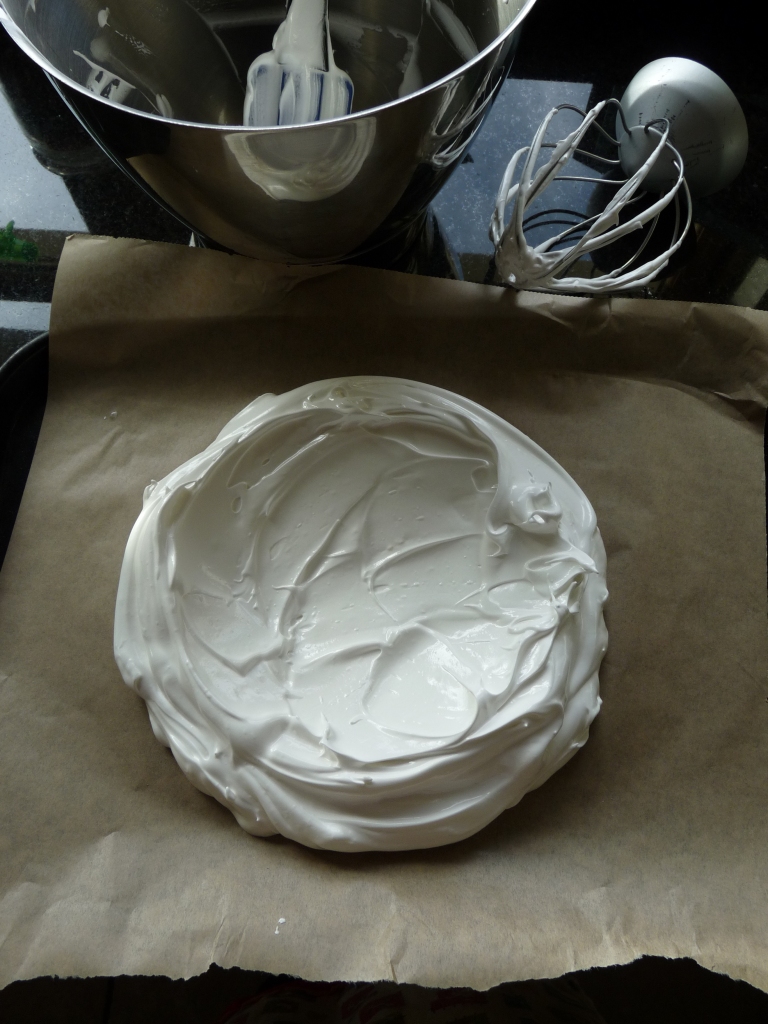
    3. Dollop the mixture in a 20cm/8in circle on the baking paper, making the sides slightly higher than the centre. Bake in the bottom of the oven for 1–1½ hours, or until the meringue is firm and crisp on the outside but still soft inside. You don’t want too much colour – it may begin to turn a very pale beige. Once cooked, turn off the oven and leave the meringue inside until completely cool.
    4. Meanwhile, prepare the fruit filling. Put the wine, caster sugar, orange zest and juice, vanilla and cinnamon into a medium saucepan set over a medium heat. Heat the liquid until just boiling, then reduce the heat to a poach. (A poach is when there is only one or two bubbles breaking the surface of the liquid.) Cook on a gentle heat for about 15 minutes, or until the liquid has become like a syrup. Add the fruit, bring back to a simmer then remove the pan from the heat, leaving the fruit to cool in the liquid.
    5. To make the vanilla cream, whip the cream, sugar and vanilla seeds in a large bowl. The cream is whipped enough when it just starts to hold its shape in the bowl.

    To Assemble (just before serving)
    Drain the fruit through a sieve-you can reserve the liquid to use again.
    To assemble the Meringue, place the meringue onto a serving plate and dollop the cream mixture all over it. Pile the drained fruit on top of the cream and serve.


    This article was published in The Westmeath Independent on 2nd March 2011.